Showing posts with label bread. Show all posts

Tuesday, January 28, 2014

Artisan Bread


I have been playing with this artisan bread recipe for about a year now. I have no idea why it took me this long in my bread making journey to find this simple process. I am convinced that artisan bread is what our pioneer and pilgrim mothers made on a daily basis. It is so simple that there is no need to feel intimidated! It makes any soup or casserole night amazing!

Saturday, September 14, 2013

Sally Lunn Bread


I tried a new recipe this week. I know that doesn't come as much of a surprise to those of you who know me - I seem to always find a recipe that peaks my interest. This recipe I found in an older cookbook at my family's cabin a few weeks ago. It caught my attention because it was listed under the bread section, but the only words in the title were "Sally Lunn." I wondered why someone's name would be listed as the title of the recipe. Little did I know how famous this recipe is or the long history behind it.

Now that I've peaked your interest, you are welcome to read more of the history of Sally Lunn bread  here.

I know now why it is famous and I'm wondering why I've never had it before. The texture reminds me of cornbread and it is oh so tasty hot from the oven, smothered in butter and drizzled with honey. It would be great served with chili or bean soup. We had it with beef stew . . . delicious!

There are a few recipes that call for yeast instead of baking powder. Now I want to try one of them and see how it compares. I'll let you know when I do.

Sally Lunn Bread

5 Tbsp butter, softened
2 Tbsp sugar
3 eggs
1 cup milk (3 Tbsp milk powder and 1 cup of water)
2 cups flour (1 cup whole wheat and 1 cup all-purpose)
1 Tbsp baking powder
1 tsp salt

Cream the butter and sugar until light and fluffy. Add the eggs and the milk and mix well. (If using powdered milk, add the water now and add the milk powder with the dry ingredients.) Add the dry ingredients. (I have used 1 cup whole wheat flour and 1 cup of white flour and it is still very good.) Pour into a greased 8 1/2x4 1/2x3 inch loaf pan. Bake at 325 degrees for 45 minutes or until a toothpick comes clean. Slice and serve warm with plenty of butter. Honey is good also.

Wednesday, July 31, 2013

Berry Cream Cheese Danish Pull-Apart Bread


I attempted a recipe I came across on the web. I couldn't get the image out of my mind so after a few days, I tackled it. You can find the original recipe here.

I made a batch of my basic bread dough instead of using pre-made dough. I also followed the suggestion to mix freezer jam with cream cheese for the filling. The result was amazing! The only thing I will do differently next time is drizzle the whole pan with frosting - it won't keep it healthy, but it will be soooo good. You could also make the presentation a little cleaner by baking them like cinnamon rolls instead of jamming them all into the pan. But, hey - no one complained at our house. The entire 9x13 pan was devoured for breakfast!

We will most definitely be making this again.

Wednesday, May 1, 2013

Super Simple Garlic Bread


I have discovered a new favorite way for making garlic bread! As the kitchen remodel continued into the 7th week, we were growing tired of just buttering sliced bread to eat with the pasta dishes I had tucked away in the freezer. I got creative yet again with my electric pancake griddle. I am still using the bathroom counter as my cooking space - notice the taps in the background. It is quite tricky to balance the long griddle on my tiny bathroom counter without it falling into the sink.


I sliced the loaf of French bread in half the long way. (The kids had eaten a few slices off the end already which is why it is not a full loaf.) I buttered it up and sprinkled on a little garlic powder. Then I flipped it over onto the hot griddle and let it toast until it was golden brown. The verdict - perfectly toasted garlic bread that we devoured. It worked out so well that I know I will use this method many more times. It allows us nicely toasted garlic bread without heating up the entire oven and kitchen. 

If you don't have one of these electric griddles, watch for one to go on sale. I see these large ones for less than $20 at least a couple times a year. We use them for pancakes, grilled cheese sandwiches, garlic bread and biscuits. I know you can also bake griddle cookies on them. (It's been awhile, but I do remember doing it once. I'll have to look up a recipe and try it again.)

The kitchen is to be completed by Friday of this week - we can't wait!


Tuesday, January 29, 2013

Maple Bars

Maple bars are a favorite at our house! The preschoolers and I will make them for an after school snack and they are devoured within a matter of minutes. They are also easy to make ahead and have in the freezer for a quick and easy breakfast treat. School friends often request that we bring them for parties and snack days because they have learned to love them as well.

Any basic bread dough recipe will work fine. My recipe is below. I like to add 1 tsp of cinnamon to the dry ingredients for extra flavor. I also always do them with 1/2 whole wheat flour and 1/2 white flour to get the added nutrition of the whole grain. Once your dough has completed the first rise, punch it down.

Roll it out so it is about 1/2 inch thick.

Cut into bars using a pizza cutter.

Place on a baking tray.

Spray the tops with Pam so they won't dry out as they rise.

Cover with a towel and allow to rise for about 20 minutes. Bake at 375° F 10-15 minutes or until golden brown.

While rising or baking, make the maple icing. Mix 3 cups powdered sugar with 2 Tbsp butter or margarine and 1 tsp maple flavoring. Add 1-2 tsp milk to thin to the right consistency.

Here it is all ready to spread.

Here is the pan of bars all baked to a golden brown.

Place bars on a wire rack to cool. Brush the tops of the bars with melted butter - my shortcut is to just rub the stick of butter on top of the hot bars. Frost those that you will be eating right away. Freeze leftover bars without icing in a ziplock bag or freezer container. Frost them once you thaw them out. The icing will stay good in the fridge for quite a few weeks.

Oh, so good!


Basic Bread Dough


3 + cups bread flour
1 tsp salt
3 Tbsp gluten flour
1 Tbsp yeast
3 Tbsp dry milk powder
2 Tbsp oil
2 Tbsp sugar
1 ¼ cups hot water

Mix according to basic bread making instructions (found here). I always do ½ white and ½ wheat flour. Cover and allow to rise until double in size. Shape and bake as desired.

Maple Bars: Add an additional 2 Tbsp sugar and 1 tsp cinnamon to the above recipe. After the first rise, roll dough out to about ½-inch thickness and cut with a pizza cutter into rectangles. Place on a greased baking sheet. Allow to rise for about 20 minutes. Bake at 375° F for 10–15 minutes or until lightly browned. Frost with maple icing and enjoy! I always triple the batch and freeze any extra before frosting. Pull them out of the freezer at night and frost in the morning for a quick breakfast treat or serve for a fun after school snack.

Maple Icing: Mix with a hand mixer 3 cups powdered sugar, 2 Tbsp margarine or butter, 1 tsp maple flavoring and just a bit of milk (1–2 tsp).


Wednesday, November 14, 2012

Make-ahead Cinnamon Rolls

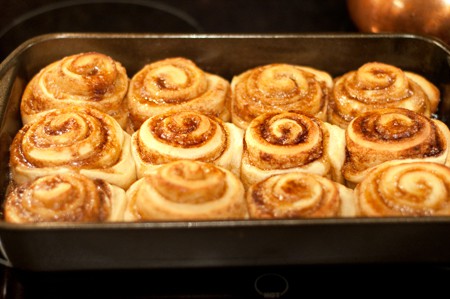
After the roll making class I taught last week, I've had a few requests for my recipes for overnight cinnamon rolls. I haven't remembered to take pictures when I've made these this year and I don't want to wait to share the recipe until I get around to taking a picture so I borrowed this picture from lanascooking.com. She has quite a few fabulous looking items on her blog and you may just want to check it out. Anyway, this picture mimics what my rolls look like fresh from the oven.


For Christmas a few years ago, we had some amazing neighbors share these rolls with us as a neighbor gift. They put the rolls together Christmas Eve and brought them down for us to refrigerate overnight and bake the next day as part of our Christmas breakfast. The Ruxtons are some of our closest friends. She is a school teacher and so doesn't have much time off ahead of the holiday to prepare gifts. This was the perfect solution. We loved it and quickly requested the recipe. Here is what they shared with us. It's very brief and missing quite a few directions.

Working Girl's Cinnamon Rolls

Dissolve 1 tsp yeast in 3 cups warm water
Add 1 cup sugar
2 beaten eggs
1/2 cup shortening
1 Tbsp salt
10 cups flour
Knead 20 minutes
Let raise 5 hours . . . at 10 pm make into rolls
Let raise overnight
Bake at 350 degrees about 25 minutes

Here are my directions after making this recipe many times.

Place 5 cups of bread flour and 1/2 cup gluten flour in a large bowl or mixer. Add 1 tsp SAF instant yeast, 1 cup sugar, and 2 tsp salt. (I cut this down from the original recipe.) Melt shortening. Add melted shortening (or substitute 1/2 cup vegetable oil) to the dry ingredients. Add 3 cups warm water and 2 beaten eggs. Begin to mix and add additional flour until you have a nice dough. You may not need all 10 cups of flour. Knead until you have a nice dough. Allow to rise for 3-4 hours. Shape into cinnamon rolls. Cover with plastic wrap and place the rolls in the fridge. Pull out of the fridge about 3 hours before baking to allow to rise until double their original size. If you have a rather cool place in your home, you may be able to leave these out rising all night. I've had better luck leaving them in the fridge and then pulling them out at 4:00 or 5:00 am or so when one of my young kids gets me up for something. I have made these using 1/2 whole wheat flour and 1/2 white flour. When I do this, I always add 1 1/2 Tbsp white vinegar to the  dough with the water. It really helps the texture stay light and fluffy.

Here is another one of my favorite recipes for make-ahead cinnamon rolls. You can freeze these ahead of baking or just allow them to rise in the fridge. These directions include more detailed information on the filling for cinnamon rolls and how to roll them. These tips will help you if you are trying the recipe above. You'll have to try both recipes and determine which is your favorite. Enjoy!


Freezer Cinnamon Rolls

4 ½–5 cups white bread flour
Filling:
¼ cup gluten flour
½ cup butter, melted
½ cup sugar
1 cup brown sugar, packed
½ tsp salt
4–5 tsp cinnamon or to taste
1 Tbsp yeast
¾ cup chopped nuts, optional
3 Tbsp dry milk powder
Frosting:
½ cup butter, melted
2 oz cream cheese, softened
2 eggs, beaten
¼ cup butter, softened
1 ¼ cups hot water
1 cup powdered sugar
1 tsp vanilla
½ tsp vanilla

Mix according to basic bread making instructions.  After completing the kneading process in your mixer, allow to rise for 10 minutes. Roll dough out into a 15x24-inch rectangle. Combine the filling ingredients to form a thick paste and spread over dough. (Chopped apples are delicious in place of the nuts.) Roll up jelly roll style, starting from the long side. Do not roll too tightly or the centers of your rolls will pop up as they rise. Use a sharp knife to mark off 1 ½-inch sections. You can either use a serrated knife to very carefully saw through the roll to make individual rolls or slide a piece of dental floss under the roll and bring the ends up crossing them as you do so. Pull the ends in opposite directions until the floss cuts through the dough forming individual rolls. Place in greased baking pans. Do not pack the rolls in the pan. They need to have space in between in order to allow room for them to rise. Remember cinnamon rolls rise out not up. To bake immediately: Cover with a towel and allow to rise until double in size. After rising they should be touching each other and the sides of the pan. Bake at 350° F for 20–25 minutes or until golden brown. Spread with frosting after cooling slightly and enjoy! To bake in a day or two: Cover with plastic wrap and refrigerate. They will slowly rise in the fridge. When ready to bake, remove from the fridge and allow to rise a little more, if needed. Then bake and frost as above. To freeze: Cover with heavy duty foil and freeze immediately. They can be frozen for up to 1 month. The night before baking, remove from the freezer and sit on your counter for 10–12 hours to thaw and rise. Then bake and frost as above. To make frosting: Cream butter and cream cheese until smooth. Add powdered sugar and vanilla. If needed, you can also add just a touch of milk to get the consistency you like. You can make the frosting ahead and refrigerate until ready to use.

Tuesday, November 6, 2012

Festive Holiday Breads

I have been baking holiday breads for years. A holiday meal isn't complete at our house without some kind of bread on the table. If you need help in basic bread making techniques, you'll want to check out this previous post. If you just need some inspiration, you've come to the right place. I thought it would be fun to share some of the recipes I have used over the years to inspire you this holiday season. Clicking on the titles below will  take you to the recipes and instructions. None of these pictures belong to me - they are what gave me the inspiration to try these recipes in the first place. Hopefully, they will inspire you too.

Squash Braid Recipe
Squash Braid Recipe photo by Taste of Home

Butternut Squash Braid

You can substitute mashed pumpkin or acorn squash in place of the butternut squash in this recipe. It also bakes into lovely dinner rolls. With it's orange color, it is beautiful on a Thanksgiving table.


Turkey Rolls

The kids always love to help arrange the rolls this way. You can use any of your favorite roll recipes or frozen dough also works.


Apple Fritter Bread

This is amazing for holiday brunch or great to give as neighbor gifts.

Other breads I've made for holidays include Cinnamon Swirl Bread, Breakfast Danish, Crescent Rolls, Buttery Yeast Rolls, Zupfa (braided Swiss bread), Hot cross Buns, and Make-ahead Cinnamon Rolls. Eventually, I may get all those recipes up here on this blog. But don't wait for me. If you feel inspired, search out a recipe and give it a try!

Sunday, April 1, 2012

Pepperoni Pizza Braid

This is a fun way to trade up your traditional pizza night. I always make two when I do this because they freeze well for my husband to take for lunch or for me to reheat another night for a quick dinner.

Begin with your favorite pizza dough. I made a double batch of my garlic breadstick dough. Each braid takes the same amount of dough as one pizza.

Roll out into long rectangles  - about as long as a jelly roll pan.

Spread with a little pizza sauce down the center.

Add your favorite pizza toppings. I made one with pepperoni and olives and one with sausage and olives. We also like using Ranch dressing in place of the sauce and adding chopped ham, bacon bits,green onions, and diced tomatoes. Feel free to get creative here. If you like it on pizza, you'll like it in this recipe.

Top with a little shredded cheese.

Use kitchen scissors to cut around the edges as shown, going in only as far as the sauce.

Tuck in one piece at a time, alternating sides as you would with a braid. Be sure to tuck the ends in well.

Place both loaves on a jelly roll pan. Allow to rise about 10 minutes. Bake at 350° F for 25–30 minutes. If browning too quickly, cover loosely with foil before baking the final 5 minutes. Let stand for 10 minutes before slicing. Serve with pizza sauce for dipping if desired. To freeze: Remove from oven after 25 minutes of cooking. Allow to cool. Wrap in a few layers of plastic wrap and freeze. To use frozen loaf: Thaw and wrap in foil. Place on a baking sheet and bake at 350° F for 10–15 minutes or until heated through.

Brush with melted butter after removing from the oven to keep the crust nice and soft.

Slice and enjoy!

Tuesday, January 24, 2012

10 Grain Bread

I've been playing a little with one of my favorite bread recipes. You'll find the recipe for Fabulous Homemade Bread here. Before now I had only tried adding oatmeal or ground flax seed to the dough. This last week, I tried adding a 10 grain cereal mix I found in the bulk section of our local grocery store. If you don't have a bulk section, check in the hot cereal isle. I'm sure there is something similar - it may not be 10 grains, but perhaps 7 or 9. I just added the 10 grain cereal mix in place of the oatmeal called for in the recipe.
Here is the dough after it has risen a bit. You can see all the little grains of healthy goodness.

Here it is after baking - golden brown and delicious!

My husband couldn't wait for it to cool. We sliced it piping hot which sometimes doesn't give such good results. This loaf sliced up nice even when it was steaming. Many times it just mushes into hot bread goodness which still tastes divine, but doesn't make for a great presentation photo.

Go ahead - add the grain mix or seeds you're craving in place of the oatmeal in my recipe. I think you'll agree it's a little slice of heaven!

Wednesday, January 11, 2012

Wiener Wraps

These are a favorite of my kids. They bring back memories of school lunch for me since that is when I remember discovering them as a kid. We ate a lot of hot dogs growing up - even on pizza since they were an inexpensive meat. But, I don't remember my mom making wiener wraps. As odd as it seems, my siblings and I looked forward to when they made it on the hot lunch menu. They really are simple to make.

Begin by making a batch of your favorite bread dough or pizza dough. You can even thaw out some frozen Rhodes dough if that is the way you do things at your house. One batch of pizza dough should give you enough for 8 wiener wraps. Break the dough into 8 equal-sized portions. Then flatten into long ovals.

Place hot dog on dough.

Use your fingers to wrap the dough around the hot dog and pinch to seal the seams.

When it is fully enclosed, place on a greased baking sheet.

Here are all eight dogs. Allow to rise for 10-15 minutes. Bake at 350 degrees for 15-18 minutes or until golden brown.

Brush the tops with butter once you remove them from the oven and allow to cool slightly on a wire rack. This keeps them from going soggy on the bottom.

Here's one where the hot dog is poking out just barely. Enjoy dipped in mustard or ketchup. Serve with French fries, if desired. For my homemade version of French fries check here. To round out the meal, you can add some fruit and vegetables. My kids wanted bottled pears and peaches. They were looking forward to dinner all day!

Thursday, October 27, 2011

Breadstick Bones


Breadstick bones are a quick way to add some fun to a Halloween party. We always serve these with "vampire blood" (pizza sauce) for dipping. These are requested every year as a healthy treat at the school parties.

Begin with your favorite pizza dough recipe or use frozen dough you have thawed. You'll find our favorite recipe here. Roll it out and cut into strips that are about 3/4 of an inch wide and 8-9 inches long.

Roll the strips into snakes.

Tie each end in a knot by looping the end and tucking it back inside.

Place on a greased baking sheet.

Leave enough space between each breadstick bone to allow for them to rise.

Bake at 425 degrees for 12-15 minutes until golden brown. Brush with melted butter and enjoy! These can be made ahead and frozen. To reheat, thaw and wrap the whole bunch in foil. Heat at 350 degrees for about 10 minutes.