Tuesday, December 11, 2012

Animal Finger Puppets - a great gift!


Here is a quick and inexpensive homemade gift idea for young kids on your list. This idea comes from the March 1989 edition of the LDS Friend magazine. I came across an old copy of it years ago before the wonderful joy of the internet.

For the pattern template and easy to read instructions click here.

I can't tell you how many times we have used this pattern. I made a set of puppets for my oldest kids when they were young. They have been in my diaper bag through all the kids! We have also made copies of the pattern and put "kits" together to give to young friends for their birthdays or other special occasions. One year we also put "kits" together to give to the pediatric ward at the hospital to give the kids something fun to do.

It just takes some felt scraps, a package of wiggly eyes and a few tiny pom-poms. Everything is glued together - no sewing needed. Feel free to be creative. Use the pictures from the original article as a guide and then just have fun with it.

We used the alligator pattern to make a big, bad wolf and then we did 3 little pigs. You get the idea -

I always like to make sure some of our gifts are homemade each Christmas. I just have learned the gifts that you invest more time in are much more fun to give and I want my kids to learn this important lesson.

Happy Giving!


Friday, December 7, 2012

Preparing for holiday baking


There are lots of preparations going on in everyone's homes this time of year. The last couple of weeks, I have been preparing for all the holiday baking. 


I made 3 batches of my All-purpose Christmas Cookie Dough. It is in the freezer for later. We did cook up a few dozen pinwheel cookies that we took to the kids' piano recital.


I made extra bean puree so I could give more "healthy" treats to neighbors and friends.


I made a double batch of the dough for these Molasses cookies. It is also in the freezer.


Yesterday, I made a large batch of this Chocolate chip cookie dough. I only added chocolate chips to some of it so I can play with the other dough. It can be an all-purpose dough also. I plan to put a Hersheys kiss in some of the cookies as well as add some of the other fun flavored chips they have available this time of year. I have put a Rolo candy in the top of each cookie, similar to what you do with the Hersheys kiss. I have also used the green and red M&Ms and pressed them in the top of each cookie before baking. There are lots of possibilities once you have a great flavored dough!


The final kind of cookie dough I hope to get to today is my Chewy Cinnamon Cookies.

Since cookie dough freezes so easily, I usually begin my preparations in November. When it comes time to take a platter to a recital or dinner party, I can pull 2-3 kinds of dough from the freezer and bake a dozen of each kind. The platter looks like I worked hard in the kitchen all day, when in reality it only took me the few minutes to form the cookies and bake them. Some years, I have even given the frozen dough as a gift to neighbors and friends. They love the chance to do some baking with their kids or grandkids without the full time commitment.

Once cookie preparations are done, I will move on to the homemade candies. All the decorating, card writing, and package wrapping also has to fit in. I'm using my crockpot most nights to give me a bit of extra time. I'll be posting some of those new recipes soon.

I learned long ago that I have to find joy in the preparations - the years that pregnancy kept me in bed over the holidays helped me realize how much I counted on the preparing as part of the actual holiday for me. Hopefully some of these recipes or tips can help you enjoy the preparations as well.

Tuesday, December 4, 2012

Holiday Cranberry Relish


I always make this relish ahead of Thanksgiving and then use it throughout the holiday season. It keeps for 6 weeks in the refrigerator. I've labeled it a pantry mix, but technically it is a "refrigerator mix." Making a large batch at Thanksgiving time gives me the freedom to use it in many ways between then and New Year's.

The recipe was shared with me soon after I was married by a good friend from church. It was her "neighbor" gift for the year and we loved it!


I always put a bit into a few jars to share with family at Thanksgiving and then I get creative with the rest of the batch. It is good with turkey or ham, just as a relish served alongside the meat. We also love to mix it with cream cheese, cool whip, and pineapple chunks for a delicious holiday salad. (Sometimes I add a little more sugar, to taste.) Mixed with cream cheese, it is also delicious as a cracker spread. You really can try it in lots of ways. My husband has been known to spread it on his toast like jam. It's good any way you want to try it. You won't have trouble using up the large batch it makes.

Watch for fresh cranberries to be marked down after Christmas. Buy a few packages and store in your freezer until next year. All you do is throw the bag in the freezer - it is that simple. They have always lasted just fine for me this way. Hope your family enjoys it as much as we do.

Holiday Cranberry Relish

1 lb fresh or frozen cranberries, finely diced
1/2 cup orange marmalade
1 cup sugar
2 tart green apples, peeled and finely chopped
10 oz. frozen raspberries, thawed and drained
1 tsp lemon juice

I chop the cranberries and apples in the food processor and then mix everything together. It makes about 6 cups.

This year, I replaced the orange marmalade with the zest from one orange and a little more sugar. The orange marmalade I had in the fridge had corn syrup in it and one of my relatives cannot eat corn. The taste was just a good.


Saturday, November 17, 2012

Thanksgiving Stuffing in the Crockpot

I've had a few family members request my Thanksgiving stuffing recipe that I've made in past years. I don't have any pictures ready to share since I haven't made it yet this year, but I felt this blog was the best way to share the info for everyone. As I go through the process this week, I will try to update with some photos.

 I have to admit that I don't have an exact recipe for the stuffing as far as the amounts go. I will do my best to guess at how much to put in, but feel free to play with the amounts to your liking. This is basically the recipe my mom always made as we were growing up. We always stuffed it into the turkey. Now the food safety specialists suggest cooking the stuffing separate from the bird. We also have some extended family members who cannot have gluten so doing the stuffing separate allows them the chance to eat the same turkey. The other challenge that we all face on Thanksgiving is having enough oven space to roast the turkey and cook the stuffing and the rolls. By adapting the stuffing recipe for the crockpot, it freed up the oven for other things.

I start drying out bread cubes a few weeks ahead of Thanksgiving. My kids always refuse to eat the heal of the bread loaf. I have a few stack up eventually because I can't eat them all. I cut them into small cubes and place them on a baking sheet. I then leave them on the counter overnight to dry out or place them in a warm oven (200 degrees or so) and allow them to dry out. You need to make sure they are good and dry. Allow to cool and then bag up for safe keeping. I do this process a few times to gather enough bread cubes to make stuffing. They will last 6 months to a year this way, if kept in an airtight container. Feel free to purchase the dry bread cubes that are available at the store this time of year instead of making your own.

I usually saute the vegetables a few days ahead of Thanksgiving to make it very easy the day of. Just store them in the fridge until you mix it all together. We often take this item to dinner when we are traveling to be with family. With the vegetables all sauteed and ready to go in the cooler and my bag of bread cubes, it goes together really fast after the turkey is in the oven.


You can make this dairy and gluten free, by using the appropriate butter substitute and gluten-free bread. That is what we did this year since we were eating with family members who suffer from allergies.


Apple Vegetable Stuffing in the Crockpot

12 cups dry bread cubes
1 large onion
2-3 carrots
3-4 stalks of celery
2 apples
1 stick butter
4-6 cups chicken broth or chicken bouillon dissolved in water
Season with sage, salt, and pepper

Peel and chop all the vegetables and apples. Saute in butter until the onions are clear. Spray the crockpot with Pam and dump the bread cubes in. Mix in the vegetables. Sprinkle a little ground sage over the mix and stir. Pour some of the broth over the stuffing. I use about 1/2 to begin with. Cook on high for 2-3 hours, stirring occasionally. Add broth as needed to gain the consistency that you like. Add additional seasonings at the end, if needed. This would fill a 4 quart crockpot.

The secret ingredient is the apples. They add a certain sweetness that is irresistible! Enjoy!

Wednesday, November 14, 2012

Make-ahead Cinnamon Rolls

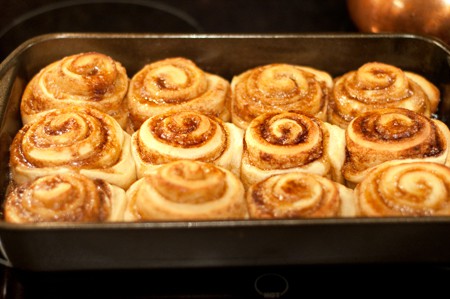
After the roll making class I taught last week, I've had a few requests for my recipes for overnight cinnamon rolls. I haven't remembered to take pictures when I've made these this year and I don't want to wait to share the recipe until I get around to taking a picture so I borrowed this picture from lanascooking.com. She has quite a few fabulous looking items on her blog and you may just want to check it out. Anyway, this picture mimics what my rolls look like fresh from the oven.


For Christmas a few years ago, we had some amazing neighbors share these rolls with us as a neighbor gift. They put the rolls together Christmas Eve and brought them down for us to refrigerate overnight and bake the next day as part of our Christmas breakfast. The Ruxtons are some of our closest friends. She is a school teacher and so doesn't have much time off ahead of the holiday to prepare gifts. This was the perfect solution. We loved it and quickly requested the recipe. Here is what they shared with us. It's very brief and missing quite a few directions.

Working Girl's Cinnamon Rolls

Dissolve 1 tsp yeast in 3 cups warm water
Add 1 cup sugar
2 beaten eggs
1/2 cup shortening
1 Tbsp salt
10 cups flour
Knead 20 minutes
Let raise 5 hours . . . at 10 pm make into rolls
Let raise overnight
Bake at 350 degrees about 25 minutes

Here are my directions after making this recipe many times.

Place 5 cups of bread flour and 1/2 cup gluten flour in a large bowl or mixer. Add 1 tsp SAF instant yeast, 1 cup sugar, and 2 tsp salt. (I cut this down from the original recipe.) Melt shortening. Add melted shortening (or substitute 1/2 cup vegetable oil) to the dry ingredients. Add 3 cups warm water and 2 beaten eggs. Begin to mix and add additional flour until you have a nice dough. You may not need all 10 cups of flour. Knead until you have a nice dough. Allow to rise for 3-4 hours. Shape into cinnamon rolls. Cover with plastic wrap and place the rolls in the fridge. Pull out of the fridge about 3 hours before baking to allow to rise until double their original size. If you have a rather cool place in your home, you may be able to leave these out rising all night. I've had better luck leaving them in the fridge and then pulling them out at 4:00 or 5:00 am or so when one of my young kids gets me up for something. I have made these using 1/2 whole wheat flour and 1/2 white flour. When I do this, I always add 1 1/2 Tbsp white vinegar to the  dough with the water. It really helps the texture stay light and fluffy.

Here is another one of my favorite recipes for make-ahead cinnamon rolls. You can freeze these ahead of baking or just allow them to rise in the fridge. These directions include more detailed information on the filling for cinnamon rolls and how to roll them. These tips will help you if you are trying the recipe above. You'll have to try both recipes and determine which is your favorite. Enjoy!


Freezer Cinnamon Rolls

4 ½–5 cups white bread flour
Filling:
¼ cup gluten flour
½ cup butter, melted
½ cup sugar
1 cup brown sugar, packed
½ tsp salt
4–5 tsp cinnamon or to taste
1 Tbsp yeast
¾ cup chopped nuts, optional
3 Tbsp dry milk powder
Frosting:
½ cup butter, melted
2 oz cream cheese, softened
2 eggs, beaten
¼ cup butter, softened
1 ¼ cups hot water
1 cup powdered sugar
1 tsp vanilla
½ tsp vanilla

Mix according to basic bread making instructions.  After completing the kneading process in your mixer, allow to rise for 10 minutes. Roll dough out into a 15x24-inch rectangle. Combine the filling ingredients to form a thick paste and spread over dough. (Chopped apples are delicious in place of the nuts.) Roll up jelly roll style, starting from the long side. Do not roll too tightly or the centers of your rolls will pop up as they rise. Use a sharp knife to mark off 1 ½-inch sections. You can either use a serrated knife to very carefully saw through the roll to make individual rolls or slide a piece of dental floss under the roll and bring the ends up crossing them as you do so. Pull the ends in opposite directions until the floss cuts through the dough forming individual rolls. Place in greased baking pans. Do not pack the rolls in the pan. They need to have space in between in order to allow room for them to rise. Remember cinnamon rolls rise out not up. To bake immediately: Cover with a towel and allow to rise until double in size. After rising they should be touching each other and the sides of the pan. Bake at 350° F for 20–25 minutes or until golden brown. Spread with frosting after cooling slightly and enjoy! To bake in a day or two: Cover with plastic wrap and refrigerate. They will slowly rise in the fridge. When ready to bake, remove from the fridge and allow to rise a little more, if needed. Then bake and frost as above. To freeze: Cover with heavy duty foil and freeze immediately. They can be frozen for up to 1 month. The night before baking, remove from the freezer and sit on your counter for 10–12 hours to thaw and rise. Then bake and frost as above. To make frosting: Cream butter and cream cheese until smooth. Add powdered sugar and vanilla. If needed, you can also add just a touch of milk to get the consistency you like. You can make the frosting ahead and refrigerate until ready to use.

Tuesday, November 6, 2012

Festive Holiday Breads

I have been baking holiday breads for years. A holiday meal isn't complete at our house without some kind of bread on the table. If you need help in basic bread making techniques, you'll want to check out this previous post. If you just need some inspiration, you've come to the right place. I thought it would be fun to share some of the recipes I have used over the years to inspire you this holiday season. Clicking on the titles below will  take you to the recipes and instructions. None of these pictures belong to me - they are what gave me the inspiration to try these recipes in the first place. Hopefully, they will inspire you too.

Squash Braid Recipe
Squash Braid Recipe photo by Taste of Home

Butternut Squash Braid

You can substitute mashed pumpkin or acorn squash in place of the butternut squash in this recipe. It also bakes into lovely dinner rolls. With it's orange color, it is beautiful on a Thanksgiving table.


Turkey Rolls

The kids always love to help arrange the rolls this way. You can use any of your favorite roll recipes or frozen dough also works.


Apple Fritter Bread

This is amazing for holiday brunch or great to give as neighbor gifts.

Other breads I've made for holidays include Cinnamon Swirl Bread, Breakfast Danish, Crescent Rolls, Buttery Yeast Rolls, Zupfa (braided Swiss bread), Hot cross Buns, and Make-ahead Cinnamon Rolls. Eventually, I may get all those recipes up here on this blog. But don't wait for me. If you feel inspired, search out a recipe and give it a try!

Wednesday, October 31, 2012

Apple Cider Making Day

Apple Cider Day is a more recent family tradition. My dad recalls having an old press when he was growing up on their small family farm. A few years ago, I mentioned that I had been reading up on making apple cider and it got him all excited about it again. For the extended family Christmas present that year, he bought a cider press with the plans that we could all get together at harvest time in the Fall to make fresh cider. He has a few apple trees on his property and it is not uncommon to pick 20+ bushels each year. This year, we picked 8 bushels off just his golden delicious tree alone! (For those of you unfamiliar with how much a  bushel of apples is, they weigh about 48lbs.) This means we picked nearly 400 lbs of apples from just one tree! We make some into applesauce and pie filling and all the rest we make into cider.

Cider is an all day event -


Washing the apples is only the beginning.


Here is the crew of cousins who are chopping the apples into quarters.


We have a set-up that uses a new sink disposal to chop the apples to bits. Here is my dad shoving the apples into the disposal unit.

Here is the apple pulp that comes out.

We collect it in buckets while it waits for the press.

These two are helping to man the press.

They hold the fabric pieces open so the apple pulp can be scooped in.

The fabric piece is twisted tight and layed between plastic disks. (We purchased the plastic parts as a cider press making kit and then added the required wood pieces to build our own press.)

We layer three pieces of this apple-filled fabric in between plastic disks.

Then the pressing begins - with the help of a car jack.

Here is a closer shot of the jack. As it is tightened down, the cider is pressed out of the apples. 

Here is a picture of the entire press.

You can see the fresh cider dripping into the pan at the bottom.

Once collected, the cider is then pasturized on the stove.

We seal it in 2 quart canning jars for enjoyment in months to come.

By the end of the day, we all feel the need for a cozy place to sleep. I slipped downstairs at my parent's home when it was time to head home and found my two youngest asleep on the couch. They had had a fun-filled day with cousins and were worn out. Were't we all! There is nothing like a work project as a family though - it builds great memories! We pressed over 50 gallons of cider!

Monday, October 29, 2012


Free Holiday Roll Making Class


Food 2 Store is a local preparedness store located on Fairview just west of Eagle Rd. between Denny's Restaurant and Seagull Book. Hope you can come - (Disclaimer: I don't work for the store. I teach classes on a volunteer only basis.)


Wednesday, November 7th 1:00 p.m.

Holiday Roll and Bread Making

Every holiday meal is better with homemade rolls! This class will cover the art of roll making. I will also share a few recipes and techniques for making other "fancy" holiday breads. Set a goal to WOW your friends and family this holiday season. You'll be excited to learn just how easy it really is. Space is limited so call or email Food 2 Store to reserve your place.

Tuesday, October 23, 2012

Canning Spaghetti Sauce

We now have 35 quarts of home-canned spaghetti sauce from our garden. It was my first year making sauce. Because I chose to pressure can it instead of using a boiling water bath, I had more freedom in the recipe I used. This recipe is not safe for the water bath canning process because it is not acidic enough.


Wash and cut your tomatoes in half. Place in a large glass bowl and cook in the microwave to release much of their juice. This saves you from having to simmer your pot down for hours on the stove- a huge plus for me! When done, strain the tomatoes from the juice. Reserve the juice just in case.


Puree the tomatoes in the food processor - peels and all.

Chop other vegetables in the food processor as well.

Here's my cute little helper. She is my only one home in the mornings this year so she has become my number one "helper." Those of you with young children know that it slows you down to have such a "helper," but I know I'm teaching her important principles so I try to be patient through it all. Her favorite job is to push the buttons on the food processor. Thank goodness mine has a lock function so it won't turn on until the lid is locked in place or I would have a giant mess!


Mix everything together. Add spices to taste. It takes more basil and oregano than you think. I buy my spices in bulk at our local grocery store. Stir in tomato paste until it is as thick as you like. You can also chop fresh herbs if you have them. I ended up adding the tomato juice back in and using a little more tomato paste so I could have a larger batch.


Fill jars. Then pressure can at 12 pounds of pressure for 20 minutes.

I ended up with about 9 quarts of sauce with this recipe. If you don't want to pressure can it, you can freeze this recipes with perfect results.

Home-Canned Spaghetti Sauce
18 cups tomato puree
3 large green peppers, chopped
3 medium onions, chopped
1 large zucchini, chopped
10 carrots, chopped
1/2 - 3/4 cup sugar
3-4 cups tomato paste - enough to make it as thick as you like
Reserved tomato juice, if needed
Dried oregano, basil, garlic, salt and pepper, to taste

Wash and cut tomatoes in half. Place in a large glass bowl. Microwave for 12-15 minutes. This allows the tomatoes to release a lot of their juice. Strain the tomatoes from the juice, but reserve the juice in case it is needed later. Chop the tomatoes in a food processor. Chop peppers, onions, zucchini, and carrots in a food processor. Mix all the ingredients together. Use some of the reserved juice, if needed, depending on how much tomato paste you added. Fill jars and pressure can at 12 lbs of pressure for 20 minutes.


Sunday, October 21, 2012

Oatmeal Breakfast Bars

I had my cub scout troop coming over to work on earning the nutrition belt loop. I wanted to provide them with a healthy snack. So, after reading a few recipes, I came up with this one. They turned out delicious! They are very low in fat and high in protein with the yogurt and the whole wheat flour. The whole wheat flour and old-fashioned oats also add a lot of fiber. The boys told me that if "healthy" could always taste this good, they would love it! The bars froze well so don't hesitate to make a large batch and save them in the freezer for school lunches or a quick breakfast on the run. They are much less expensive to make than the store bought breakfast or protein bars and really don't take that long to put together.

Note: If you've tried this great recipe and you feel ready to try  an alternative, egg-free option try out banana oatmeal breakfast bars. It's very similar to this original recipe but has the distinct flavor of bananas. We love it!

Mix wet ingredients.

Add dry ingredients.

Mix well.

I added the oatmeal in a separate step, but you don't have to.


I made a double batch so I divided it into two 9x13 pans before adding the dried fruit.

I put raisins in one batch and chocolate chips in the other. Mix together well.

Press into greased pans. It doesn't look like much, but they rise to nearly double in size.

Delicious!

Oatmeal Breakfast Bars
1 cup brown sugar
1 cup plain yogurt
1 egg
2 tsp vanilla
2 Tbsp vegetable oil
3/4 cup whole wheat flour
3/4 cup all-purpose flour
1 tsp baking soda
1 tsp cinnamon
1/2 tsp salt
3 cups old-fashioned oats
1 cup dried fruit or chocolate chips

Mix brown sugar, yogurt, egg, vanilla and oil. Add dry ingredients and mix well. If mixture looks too dry, add 1-2 Tbsp milk. (The need for milk will depend on how thick your yogurt is. My homemade yogurt is thinner than store bought so I did not need to add any milk.) Add dried fruit or chocolate chips very last. Press into a greased 9x13 pan. Bake at 350 degrees for 20-25 min. or until golden brown.Cut into bars. These freeze very well. Allow the bars to cool completely before placing in freezer bags or containers.