Saturday, November 17, 2012

Thanksgiving Stuffing in the Crockpot

I've had a few family members request my Thanksgiving stuffing recipe that I've made in past years. I don't have any pictures ready to share since I haven't made it yet this year, but I felt this blog was the best way to share the info for everyone. As I go through the process this week, I will try to update with some photos.

 I have to admit that I don't have an exact recipe for the stuffing as far as the amounts go. I will do my best to guess at how much to put in, but feel free to play with the amounts to your liking. This is basically the recipe my mom always made as we were growing up. We always stuffed it into the turkey. Now the food safety specialists suggest cooking the stuffing separate from the bird. We also have some extended family members who cannot have gluten so doing the stuffing separate allows them the chance to eat the same turkey. The other challenge that we all face on Thanksgiving is having enough oven space to roast the turkey and cook the stuffing and the rolls. By adapting the stuffing recipe for the crockpot, it freed up the oven for other things.

I start drying out bread cubes a few weeks ahead of Thanksgiving. My kids always refuse to eat the heal of the bread loaf. I have a few stack up eventually because I can't eat them all. I cut them into small cubes and place them on a baking sheet. I then leave them on the counter overnight to dry out or place them in a warm oven (200 degrees or so) and allow them to dry out. You need to make sure they are good and dry. Allow to cool and then bag up for safe keeping. I do this process a few times to gather enough bread cubes to make stuffing. They will last 6 months to a year this way, if kept in an airtight container. Feel free to purchase the dry bread cubes that are available at the store this time of year instead of making your own.

I usually saute the vegetables a few days ahead of Thanksgiving to make it very easy the day of. Just store them in the fridge until you mix it all together. We often take this item to dinner when we are traveling to be with family. With the vegetables all sauteed and ready to go in the cooler and my bag of bread cubes, it goes together really fast after the turkey is in the oven.


You can make this dairy and gluten free, by using the appropriate butter substitute and gluten-free bread. That is what we did this year since we were eating with family members who suffer from allergies.


Apple Vegetable Stuffing in the Crockpot

12 cups dry bread cubes
1 large onion
2-3 carrots
3-4 stalks of celery
2 apples
1 stick butter
4-6 cups chicken broth or chicken bouillon dissolved in water
Season with sage, salt, and pepper

Peel and chop all the vegetables and apples. Saute in butter until the onions are clear. Spray the crockpot with Pam and dump the bread cubes in. Mix in the vegetables. Sprinkle a little ground sage over the mix and stir. Pour some of the broth over the stuffing. I use about 1/2 to begin with. Cook on high for 2-3 hours, stirring occasionally. Add broth as needed to gain the consistency that you like. Add additional seasonings at the end, if needed. This would fill a 4 quart crockpot.

The secret ingredient is the apples. They add a certain sweetness that is irresistible! Enjoy!
Wednesday, November 14, 2012

Make-ahead Cinnamon Rolls

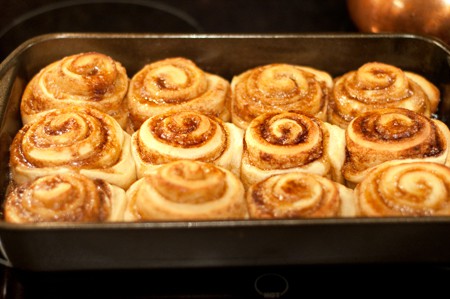
After the roll making class I taught last week, I've had a few requests for my recipes for overnight cinnamon rolls. I haven't remembered to take pictures when I've made these this year and I don't want to wait to share the recipe until I get around to taking a picture so I borrowed this picture from lanascooking.com. She has quite a few fabulous looking items on her blog and you may just want to check it out. Anyway, this picture mimics what my rolls look like fresh from the oven.


For Christmas a few years ago, we had some amazing neighbors share these rolls with us as a neighbor gift. They put the rolls together Christmas Eve and brought them down for us to refrigerate overnight and bake the next day as part of our Christmas breakfast. The Ruxtons are some of our closest friends. She is a school teacher and so doesn't have much time off ahead of the holiday to prepare gifts. This was the perfect solution. We loved it and quickly requested the recipe. Here is what they shared with us. It's very brief and missing quite a few directions.

Working Girl's Cinnamon Rolls

Dissolve 1 tsp yeast in 3 cups warm water
Add 1 cup sugar
2 beaten eggs
1/2 cup shortening
1 Tbsp salt
10 cups flour
Knead 20 minutes
Let raise 5 hours . . . at 10 pm make into rolls
Let raise overnight
Bake at 350 degrees about 25 minutes

Here are my directions after making this recipe many times.

Place 5 cups of bread flour and 1/2 cup gluten flour in a large bowl or mixer. Add 1 tsp SAF instant yeast, 1 cup sugar, and 2 tsp salt. (I cut this down from the original recipe.) Melt shortening. Add melted shortening (or substitute 1/2 cup vegetable oil) to the dry ingredients. Add 3 cups warm water and 2 beaten eggs. Begin to mix and add additional flour until you have a nice dough. You may not need all 10 cups of flour. Knead until you have a nice dough. Allow to rise for 3-4 hours. Shape into cinnamon rolls. Cover with plastic wrap and place the rolls in the fridge. Pull out of the fridge about 3 hours before baking to allow to rise until double their original size. If you have a rather cool place in your home, you may be able to leave these out rising all night. I've had better luck leaving them in the fridge and then pulling them out at 4:00 or 5:00 am or so when one of my young kids gets me up for something. I have made these using 1/2 whole wheat flour and 1/2 white flour. When I do this, I always add 1 1/2 Tbsp white vinegar to the  dough with the water. It really helps the texture stay light and fluffy.

Here is another one of my favorite recipes for make-ahead cinnamon rolls. You can freeze these ahead of baking or just allow them to rise in the fridge. These directions include more detailed information on the filling for cinnamon rolls and how to roll them. These tips will help you if you are trying the recipe above. You'll have to try both recipes and determine which is your favorite. Enjoy!


Freezer Cinnamon Rolls

4 ½–5 cups white bread flour
Filling:
¼ cup gluten flour
½ cup butter, melted
½ cup sugar
1 cup brown sugar, packed
½ tsp salt
4–5 tsp cinnamon or to taste
1 Tbsp yeast
¾ cup chopped nuts, optional
3 Tbsp dry milk powder
Frosting:
½ cup butter, melted
2 oz cream cheese, softened
2 eggs, beaten
¼ cup butter, softened
1 ¼ cups hot water
1 cup powdered sugar
1 tsp vanilla
½ tsp vanilla

Mix according to basic bread making instructions.  After completing the kneading process in your mixer, allow to rise for 10 minutes. Roll dough out into a 15x24-inch rectangle. Combine the filling ingredients to form a thick paste and spread over dough. (Chopped apples are delicious in place of the nuts.) Roll up jelly roll style, starting from the long side. Do not roll too tightly or the centers of your rolls will pop up as they rise. Use a sharp knife to mark off 1 ½-inch sections. You can either use a serrated knife to very carefully saw through the roll to make individual rolls or slide a piece of dental floss under the roll and bring the ends up crossing them as you do so. Pull the ends in opposite directions until the floss cuts through the dough forming individual rolls. Place in greased baking pans. Do not pack the rolls in the pan. They need to have space in between in order to allow room for them to rise. Remember cinnamon rolls rise out not up. To bake immediately: Cover with a towel and allow to rise until double in size. After rising they should be touching each other and the sides of the pan. Bake at 350° F for 20–25 minutes or until golden brown. Spread with frosting after cooling slightly and enjoy! To bake in a day or two: Cover with plastic wrap and refrigerate. They will slowly rise in the fridge. When ready to bake, remove from the fridge and allow to rise a little more, if needed. Then bake and frost as above. To freeze: Cover with heavy duty foil and freeze immediately. They can be frozen for up to 1 month. The night before baking, remove from the freezer and sit on your counter for 10–12 hours to thaw and rise. Then bake and frost as above. To make frosting: Cream butter and cream cheese until smooth. Add powdered sugar and vanilla. If needed, you can also add just a touch of milk to get the consistency you like. You can make the frosting ahead and refrigerate until ready to use.

Tuesday, November 6, 2012

Festive Holiday Breads

I have been baking holiday breads for years. A holiday meal isn't complete at our house without some kind of bread on the table. If you need help in basic bread making techniques, you'll want to check out this previous post. If you just need some inspiration, you've come to the right place. I thought it would be fun to share some of the recipes I have used over the years to inspire you this holiday season. Clicking on the titles below will  take you to the recipes and instructions. None of these pictures belong to me - they are what gave me the inspiration to try these recipes in the first place. Hopefully, they will inspire you too.

Squash Braid Recipe
Squash Braid Recipe photo by Taste of Home

Butternut Squash Braid

You can substitute mashed pumpkin or acorn squash in place of the butternut squash in this recipe. It also bakes into lovely dinner rolls. With it's orange color, it is beautiful on a Thanksgiving table.


Turkey Rolls

The kids always love to help arrange the rolls this way. You can use any of your favorite roll recipes or frozen dough also works.


Apple Fritter Bread

This is amazing for holiday brunch or great to give as neighbor gifts.

Other breads I've made for holidays include Cinnamon Swirl Bread, Breakfast Danish, Crescent Rolls, Buttery Yeast Rolls, Zupfa (braided Swiss bread), Hot cross Buns, and Make-ahead Cinnamon Rolls. Eventually, I may get all those recipes up here on this blog. But don't wait for me. If you feel inspired, search out a recipe and give it a try!