Tuesday, November 1, 2011

Dehydrating Peaches or Pears

I'm behind in getting these pictures posted. Hopefully, you can still find some pears. The best peaches are done for the year in our area, but you may be able to still find some nectarines and you can dry them the same way.

Wash the fruit. Slice and remove the core. Slice into thin pieces, trying to keep them as uniform in thickness as possible.

Spread out on your dehydrator tray.

Here is a close-up that allows you to see about how thick to cut them.

Dry for 4-6 hours until leathery to the touch.

Slice peaches in a similar fashion. My favorite peach variety to dehydrate is the O'Henry. They are so sweet!

Here they are all dried.

Remove the dry slices from the tray and store in a ziplock bag for a year or more. It is hard to keep dried fruit that long at our house. The kids love it! It is a quick and convenient way to send fruit in their lunches. It also works great in the diaper bag for younger kids. When my sweet tooth acts up and I go to the pantry searching for a treat, I often grab some dried fruit. It gives me the sweetness I am craving, but none of the empty carbs.


Monday, October 31, 2011

Money Saving Tips For Holiday Gifts


Tip #3 - Make-over something you already have at home. Look through your closets and other storage areas to find items you aren't using anymore. Get creative and turn them into gifts everyone on your list would love!

Here are a few thoughts to get you started - 

     - A fresh coat of spray paint can make an old picture frame "new" again.
     - Some ribbon and a cute flower can dress up a shirt or bag.
     - Use some cute stencils and bright colored paint to turn that old bookshelf into a great playroom storage shelf.
     - Old glass jars can be dressed up with ribbon to create darling candle holders.
     - Create a unique pillow by sewing the openings of a smaller T-shirt closed and stuffing it. My 10-year-old daughter would love it!

There are plenty more ideas on the internet I'm sure. Let your creative juices flow and you'll be able to come up with something to do for everyone - but you'll have to get started early so you have time to finish your projects.

Thursday, October 27, 2011

Breadstick Bones


Breadstick bones are a quick way to add some fun to a Halloween party. We always serve these with "vampire blood" (pizza sauce) for dipping. These are requested every year as a healthy treat at the school parties.

Begin with your favorite pizza dough recipe or use frozen dough you have thawed. You'll find our favorite recipe here. Roll it out and cut into strips that are about 3/4 of an inch wide and 8-9 inches long.

Roll the strips into snakes.

Tie each end in a knot by looping the end and tucking it back inside.

Place on a greased baking sheet.

Leave enough space between each breadstick bone to allow for them to rise.

Bake at 425 degrees for 12-15 minutes until golden brown. Brush with melted butter and enjoy! These can be made ahead and frozen. To reheat, thaw and wrap the whole bunch in foil. Heat at 350 degrees for about 10 minutes.

Halloween Ghosts

When holidays are approaching, I always pick up the ingredients I need to make the traditional treats the family is accustomed to. I do this a month or two early so I can count the ingredients as part of my 3 month supply. If an extra stressful time hits your family right around a holiday, it is helpful to still be able to eat your traditional foods. 

These little ghosts are so simple. My preschoolers love the chance to help make them!


They take three ingredients - Nutter Butter cookies (those of you with nut allergies could look for a similar shaped cookie) white dipping chocolate, and mini chocolate chips. All of these ingredients will store for quite a few months.

Melt the dipping chocolate in the microwave. Dip the cookies in the chocolate being sure to coat them well.

Lay on waxed paper to harden. Place two mini chocolate chips on for eyes before the chocolate hardens. Enjoy! They will store dipped for quite some time also if you can keep yourself and your kids from eating them. They work great for school parties because they can be done ahead of time and sent in with your child if your schedule does not allow you to take something in the time of the party.

Wednesday, October 26, 2011

Garlic Butter Spread

Garlic bread is a favorite around here. Making your own garlic butter spread is very easy and saves you quite a bit of money.

Begin by putting butter, margarine, or whatever kind of spread you have at home in a small container. (The Smart Balance is dairy and gluten free for those with allergies.) I usually do about 1/4 cup. Allow to soften.

Sprinkle in some garlic powder and dried parsley. I never measure. The parsley is just for color so you don't need much. The garlic adds the flavor. Add it to taste.

This is what it looks like with the seasonings added.

Stir together.Store in the fridge in an airtight container.

It is delicious on homemade warm ciabatta bread. It is also quick and easy to turn a store bought loaf of French bread into garlic bread when you want it to go with dinner. I love having some of this mixed up ready to go.

Monday, October 24, 2011

Money Saving Tips For Holiday Gifts


Tip #2 - Consider making some of your gifts this year. If you get an early start, you can put together some very thoughtful gifts with items you already have at home so the cost is very minimal. 

Here is a quick list to get you brainstorming. These can work for neighbors, co-workers, teachers, friends and even family.

- Homemade bread or rolls for their holiday table
- Homemade jam or pie filling
- Pancake or waffle mix 
          Here is an whole grain mix recipe
          Here is a pumpkin waffle mix recipe
- Family Home Evening Packets or preschool games- there are many ideas for these online. We got a few of these one year and it has been wonderful to just pull out a file and have the lesson and activity all laminated and ready to go! We have used them repeatedly over the years.
- Crochet or knit stockings or a scarf and hat set. Look online for a free pattern.
- Make a quiet book for children using fabric scraps
- Sew a set of bean bags for younger children
- Make pillowcases out of holiday or themed fabric they would love
- Put together a coupon book offering services that can redeemed later such as babysitting, house cleaning, a lunch date, etc.
- How about a family history gift? Write down some of your stories from growing up in story book format to share with your kids or grandkids. 


This list is meant to get you thinking. We always end up doing some homemade gifts every year. It gets me in the spirit of the holiday a little early as I work to put them together. It also helps to keep us within our holiday budget.

Wednesday, October 19, 2011

Blackberry Turnovers

We were invited to pick a friend's blackberry patch for Family Night a few weeks ago. All the while we were picking, the kids kept coming up with more things we could make with the blackberries. Blackberry pie, blackberry jam, blackberry syrup, blackberry smoothies, blackberry ice cream, blackberry turnovers - here is my attempt at the turnovers.

Remember all the freezer jam I was making? This is a great use for it!

Begin with pie dough. Any pie crust recipe will work. I had some in the freezer I pulled out.

Roll it out thin between two pieces of plastic wrap. You don't want to add any additional flour or else you will get the fat to flour ration off and your crust won't be as crispy.

I have this little turnover cutter, but you could cut out circles with a large cup or a small bowl.

Once I've used the bottom of the tool to cut circles, I place the circle in the top of the tool.

Here's that tasty blackberry freezer jam. Any flavor jam would work and it wouldn't have to be frozen. You could use store bought, bottled jam. I just love the fresh flavor of the frozen jam.

Place a little (1-2 tsp) on one side of your circle.

Fold dough in half. And crimp closed.


Place on a baking sheet.

Use a fork to make sure they are crimped very well around the edges. Bake at 400 degrees for 12-15 minutes until just slightly brown. Allow to cool on a wire rack.

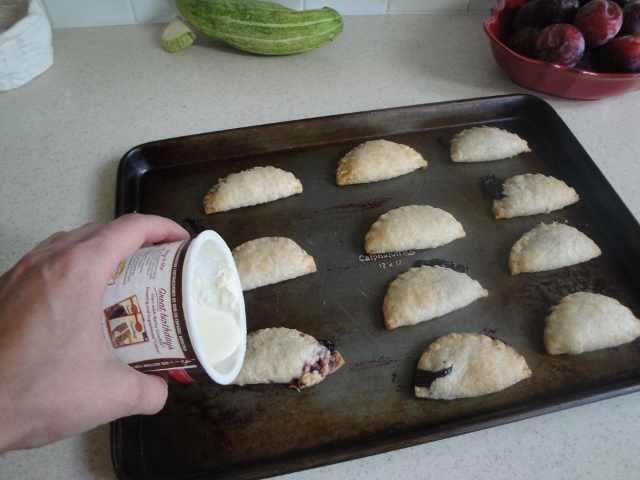
Once cooled, you can drizzle with a little powdered sugar icing. I usually make some, but I found this little bit of frosting left in the fridge and used it instead. Heat in the microwave for a few seconds so it will pour out.

Slowly pour over the turnovers and allow to harden. (I placed the turnovers back on the baking sheet to do the frosting to contain the mess.)

These didn't last two minutes once the kids came home from school. I had to hide one so my husband, James, could have a taste!


You could use this same idea to make homemade poptarts. The concept is the same. They are just made in a different shape. Just roll out your pie crust and cut in rectangles with a pizza cutter or knife. Place a little filling on each rectangle and top with an additional rectangle. Crimp the edges and bake. Frost as desired.